
The more you practice something the better you become at it and this is true for restoration of old photos using photoshop, one of my hobbies turned into a useful photographer’s skill.
A few years ago, as a Christmas present for members of my family, I restored a 1937 photograph of my grand father who served in the Royal Navy during WWII.


Already familiar with Photoshop but keen to add new skills to my repertoire, I decided to teach myself how to restore and colourise old photos which had suffered the test of time. This included learning how to remove stains from photographs using Photoshop and how to colourise using layer masks.
A little more recently I applied these new skills to a black and white photograph of my mother from 1968, at the time she was aged 21.
I recorded the process and published a simple video tutorial of the colourisation to help those curious to learn how to colourise old black and white photos:

There is real excitement and a developing addiction to the feeling one gets from bringing a photo back to life. Restoring the contrast, removing stains, scratches and blemishes, doing some research to figure what were the correct colours…
Photo restoration and colourisation will take as long as you can dedicate to them.
I wish I could use all my time on personal projects such as these but it’s not possible. Whilst a simple restoration may only require an afternoon, in most cases this kind of enterprise demands days of fine meticulous work and attention to detail.
The example below was a bit more complicated.
This photo from the fifties had suffered heavy and uneven light-bleaching from years hanging right by a window in full sun. This meant colours and detail were faded to the maximum. In addition to this, near a quarter of the image was covered in glue-like stains.
I used the spot-healing tool in Photoshop of which I recently published a video tutorial.
The spot-healing tool is a real magic wand which allows you to delete objects in photos or in this case… stains. Choosing the right brush size, hardness and opacity are key. With a bit of trial an error we get it right.
The difficulty resides in deleting stains covering intricate detail such as faces, wood carvings,… While you want to remove the stain you do not want to reshape the face and make it unrecognisable through your guess work. As photo restorers we make an interpretation of what should be there to the best of our ability.
At times I feel it is best to be conservative and leave some stains if one feels their level isn’t advanced enough instead of making a huge mess. This applies to most things creative, less is more. I’m not advocating giving-up without trying but instead to know when to stop.
In various areas of the photo I had to correct the colour, contrast, colour balance, curves, use dodge and burn tools…
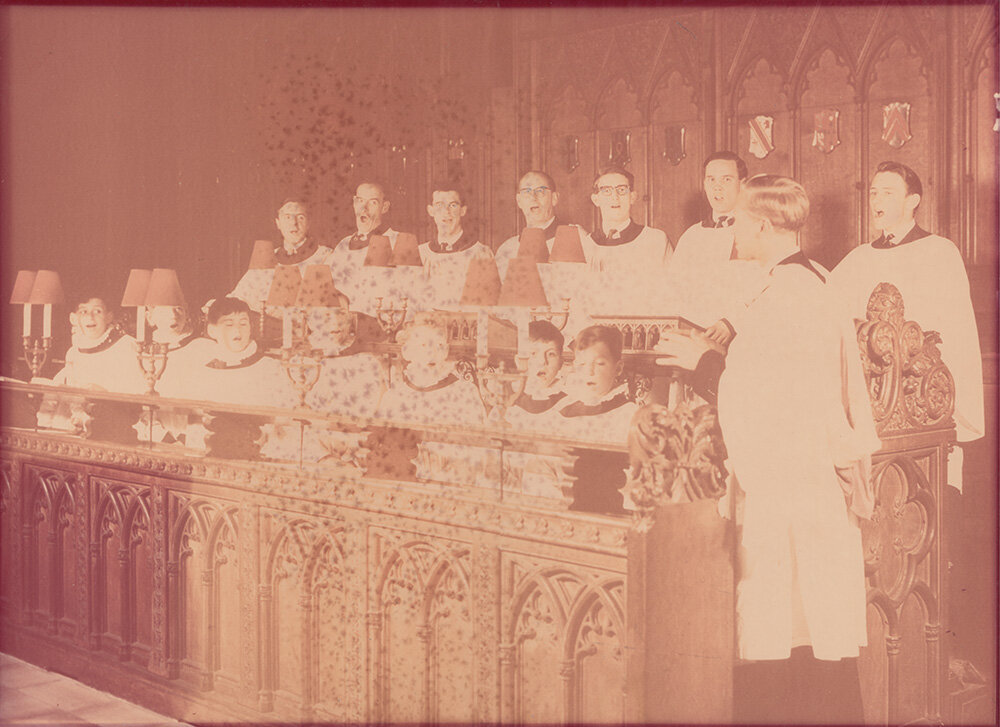
I worked to equalise the colour of the wood panels in the foreground (they were not as discoloured to the left of the photo) but with limited success. I’m sure I could think of a better way to achieve that but I just didn’t have enough time to spare on this particular project unfortunately.
Still I managed to bring back some colour.

I think overall this is quite a dramatic result considering the condition of the original photo which left me very little hope… at first.
The photo was really damaged and washed-out with little left for me to work with. Once again it is proof that perseverance pays off. I learnt a lot in the process as I always do when I take over a challenging project which tests my limits.
I hope this post will motivate you to get your own photos restored either by doing it yourself or hiring someone like me to do it for you. Be sure to watch the videos linked in this article if you’d like to learn more.
Please share this if you liked it and remember to subscribe to my YouTube channel for upcoming video tutorials.
Until next time.